 Today we will introduce how to install sensor urinal flusher RJY-22-P101AD.
Before we start installation, we need to know “BEFORE INSTALLATION”.
1) Please read the instructions carefully.
2) The sketch map is only for reference. Product appearance and accessories may differ from illustrations in manual.
3) It is suggested to install the products by a licensed plumber.
4) Please make sure the pipeline is not blocked.
5) Please make sure the water is clean without impurities.
The following may needed for proper installations: wrench,screwdriver, sealing tape,pliers, etc.
The installation includes three main steps.
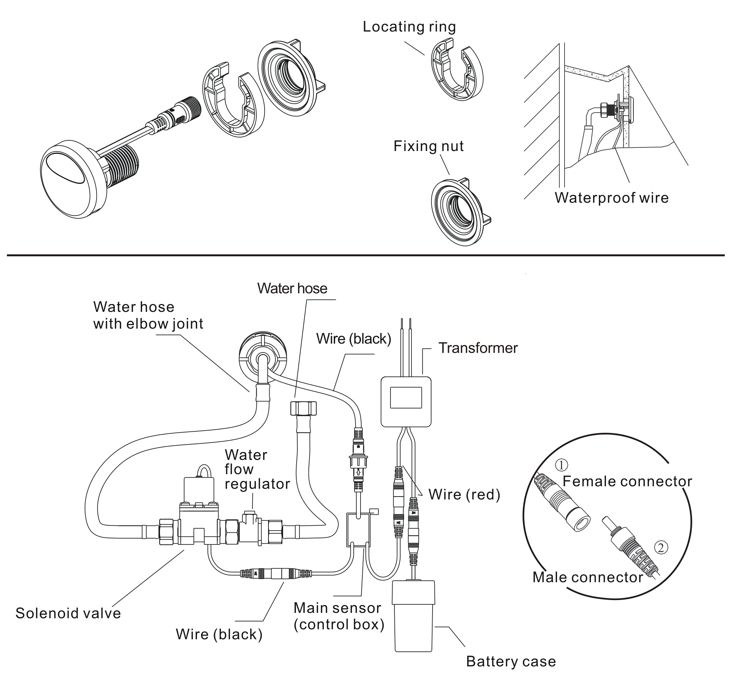
- How to install sensor plate.
Unscrew the fixing nut from the sensor plate. Install the sensor plate to the ceramic and position the plate in the right place. Fix the sensor plate to the ceramic with the fixing nut.
- How to install solenoid valve and pipes.
Step 1: Fix water flow regulator to solenoid valve inlet.
Step 2: Connect elbow hose to the sensor plate and solenoid valve outlet (refer to the drawing).
Step 3: Connect water hose to the water flow regulator inlet and main water supply.
- How to connect power supply.
Connect main power AC220 to AC transformer. Connect AC transformer to the battery pack as well as the sensor eye (red wire). Connect solenoid valve to the sensor eye (black wire). Please make sure the wires are correctly connected without gap to make it waterproof.
Technical parameters
| Product Name | Automatic Urinal Flush |
| Power Supply | DC6V/AC220V |
| Operation Consumption | <60uA |
| Dynamic Power Consumption | <180mA |
| Sensor Distance | Factory default 65±5cm (29.7*29.7cm white board)
20-60cm (adjustable by remote controller) |
| Flush Duration | Period 1: about 2 seconds |
| Period 2: about 6 seconds | |
| Water Pressure | 0.1-0.7 Mpa |
| Water Inlet Specification | DN15 (G1/2″) |
| Installation Way | Installed into the ceramic |
Replace Batteries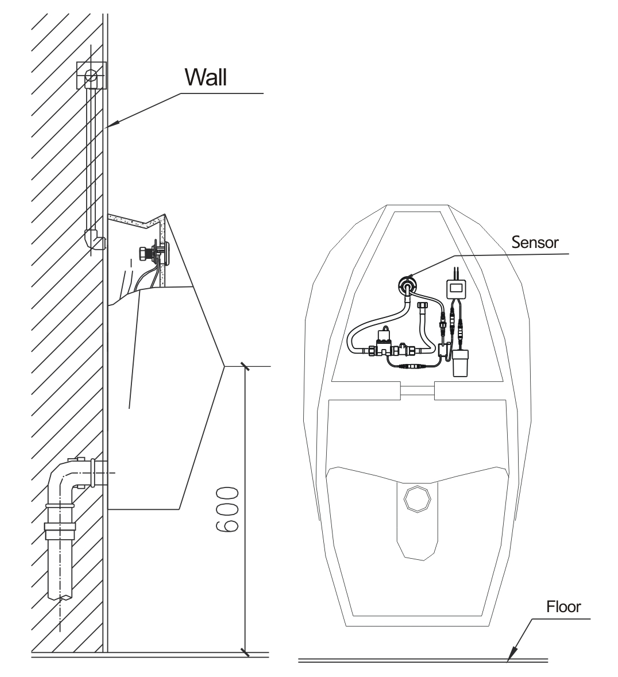
Indicator light will flash every 3-4 seconds if battery power is low, alerting you to change batteries. Do no worry: If battery power runs out the sensor will shut off and water will not flow.
Step 1: Please take out of the batteries from the urinal.
Step 2: Replace with four AA alkaline batteries.
Note: Make sure the batteries are installed correctly (positive and negative charge). DO NOT mix new old batteries. DO NOT mix batteries of different brands.