Exposed sensor toilet flusher, automated flush, hygiene, saving water and energy. Suitable for new renovations and retrofits.
How to Install Expose Sensor Flusher
Before installing the exposed automatic flusher, please pay attention to below:
Please open the master valve to clean the waterway before installing a new product to avoid blockage and damage to the flusher.
Please check whether the distribution water pressure matches the product specifications before installation.
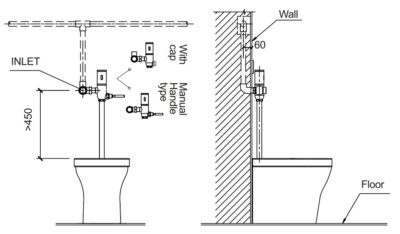
Measure the installation position of the squatting pan and the flusher before installation. The squatting pan and the flusher should be kept on the same center line.
It is suggested to install the products by a licensed plumber.
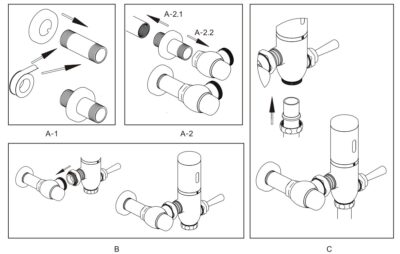
Start installing exposed inductive flusher as below:
First step:
Install the water inlet assembly. Put the decorative cover into the connecting tube, and wrap the sealing tape around the thread on both ends of the connecting tube (as Figure A-1). Screw one end of the connecting tube with the decorative cover to the water supply hole on the wall(as Figure A-2.1) Screw the other end of the connecting tube to another connector(as figure A-2.2)and correct the direction.
Second step:
Screw the flushing valve body into the water inlet assembly(as Figure B).
Third step:
Remove the conical gasket and nut from the flushing valve body, insert them into the toilet inlet pipe, and then screw the flushing valve body outlet to the toilet inlet pipe(as Figure C).
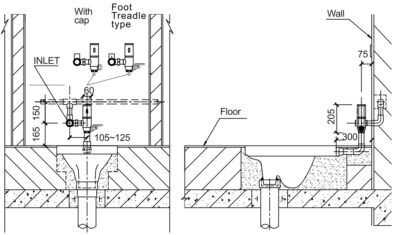
Installation drawing and finished:
Note: Make the water supply test of the inlet pipe to ensure it is no leakage.
Sensor Flush for installing squatting pan:
RJY-31-B102D with foot treadle
RJY-31-B103D only with sensor
Sensor Flush for installing toilet:
RJY-31-B102D with manual handle
RJY-31-B103D only with sensor
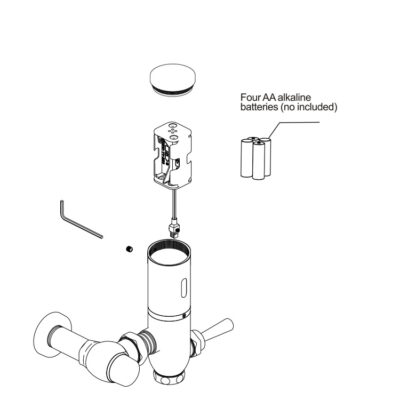
Replace Batteries
Screw out the top cover, and take out the battery’s case. Replace with four AA alkaline batteries.
Note:
Make sure the batteries are installed correctly(“+” positive and “-” negative charge).
DO NOT mix new& old batteries. DO NOT mix batteries of different brands.
Please change batteries when the indicator light keeps flashing indicating the batteries do not have enough power.
Maintenance