In this article, let’s continue to introduce the installation details for Sensor Toilet Flush Valve RJY-30-S203AD
Before installing automatic flushometer:
Please make sure to use tap water, unfiltered and treated sewage may cause damage to the device
Please make sure the water outlet keeps downwards.
Please avoid the installed location where sunlight or strong light will directly shine on the sensor to avoid the performance of the device is degraded.
It is suggested to install the products by a licensed plumber.
Start installing automatic flush valve as the following:
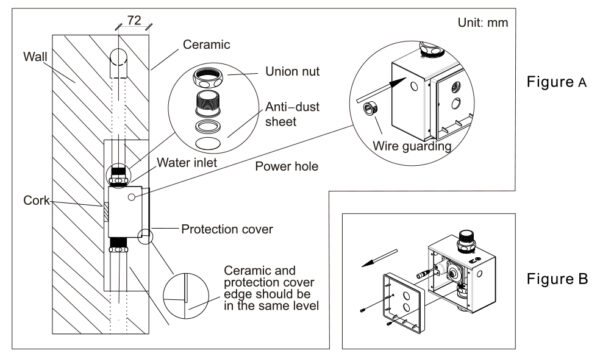
Step 1: EMBEDDED BOX INSTALLATION
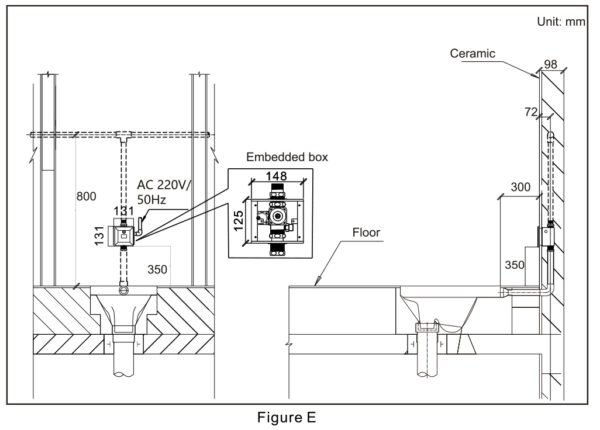
Remove the anti-dust sheet from the water inlet, then put the embedded box into the wall( water outlet downwards, protection cover edge should parallel with the ceramic). Loosen the nut at the water inlet, and tighten the union nut with the inlet thread. Insert the outlet pipe into the water outlet and pass through the tapered rubber gasket, and then tighten the union nut.
Step 2: PANEL INSTALLATION
1. Unscrew the screws and remove the protection cover (as shown in Figure B). And open the water supply to test if there is any leakage, if no leakage, then continue to next.
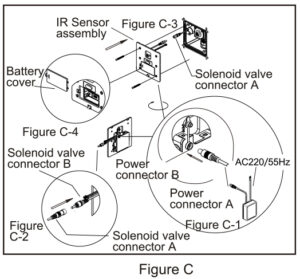
2. Connect the adapter wire AC220V/50HZ to the main power, and connect the power connector A & B (Figure C-1), then place the adapter into the embedded box. Connect the solenoid valve connector A & B(Figure C-2), and fix the IR sensor assembly to the embedded box with screws(Figure C-3).
3. Open the battery cover and put it into 2AA standard alkaline batteries (as shown in Figure C-4)
4. Final, fix the S/S panel, just push it until hearing the click.
Please pay attention to the installation height when you install the conceal sensor toilet flusher.
How to use this auto toilet flusher: When you enter the sensing range over 3 seconds, the sensor is ready for work, and take auto flush the water after you leave 3 seconds.
Replace Batteries
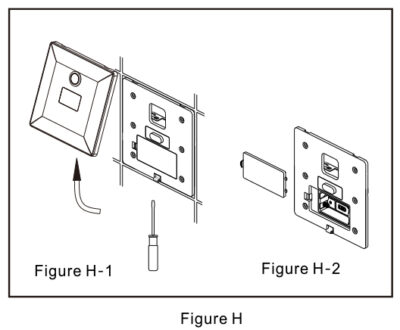
Use a flat-blade screwdriver to insert the buckle at the bottom of the panel and remove the panel (as shown in Figure H-1). Open the battery cover, replace 2AA new alkaline batteries, and fix them back (as shown in Figure H-2).
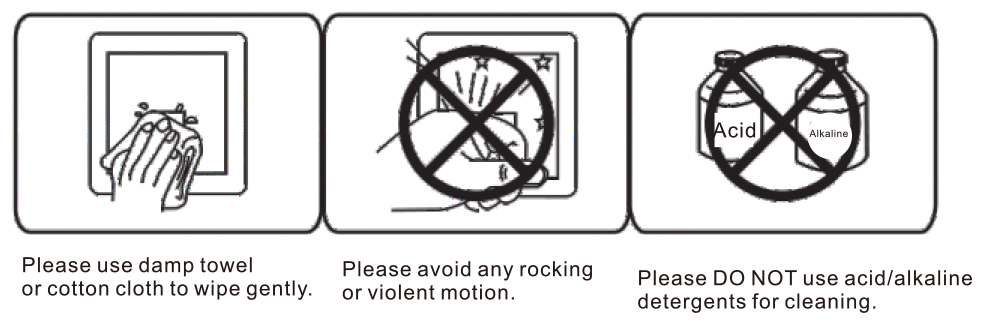
Note for cleaning after installation:
1. Please use a damp towel or cotton cloth to wipe gently.
2. Please avoid any rocking or violent motion.
3. Please DO NOT use acid/alkaline detergents for cleaning.